VictoriaMetrics Enterprise supports specifying multiple retentions for distinct sets of time series and tenants. If you are an Enterprise user, configure multiple retentions directly through retention filters instead of following this guide.
This guide explains how to set up multiple retentions using an open-source VictoriaMetrics Cluster .
Overview #
VictoriaMetrics retains metrics by default for 1 month. You can change data retention with the
-retentionPeriod command-line flag
, but this value applies to all time series stored on a given vmstorage node and cannot be customized per tenant or per metric in the open source version.
The core idea of this guide is to run separate logic groups of storages (or even clusters) with individual -retentionPeriod settings, while still providing a single unified write and read path via vmagent and vmselect.
Multi-Retention Architecture #
To support multiple retentions with the open source version of VictoriaMetrics cluster, you can split the cluster into several logical groups of storage nodes. Each group is configured with a different -retentionPeriod and receives only the data that must follow that retention.
Each storage group is connected to a separate vminsert, while a shared vmselect layer queries across all storage groups so that dashboards and alerts continue to see a single unified VictoriaMetrics backend.
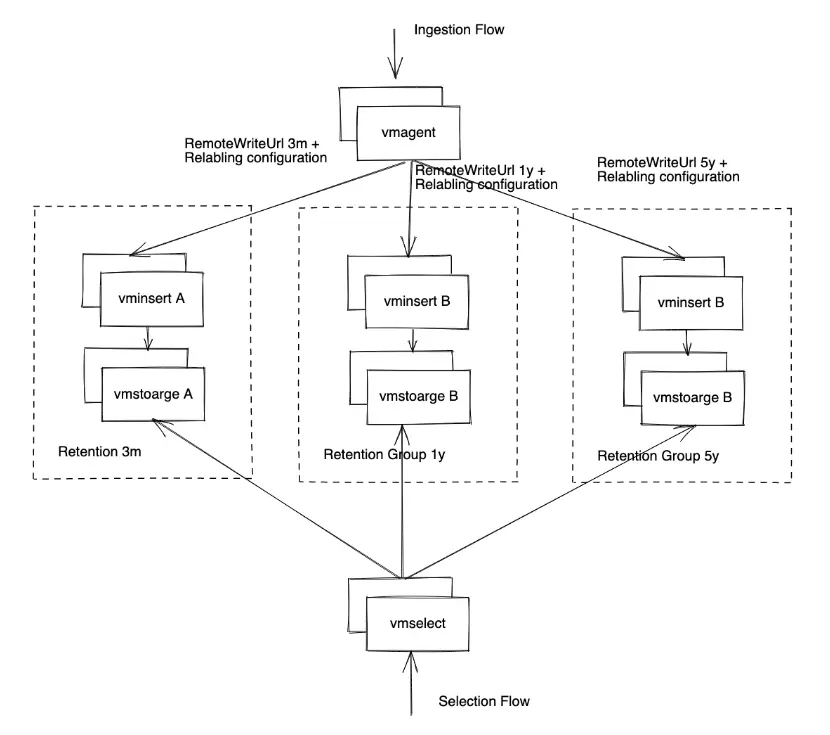
In the example used throughout this guide, the cluster is divided into three groups:
- Group A: 3-month retention.
- Group B: 1-year retention.
- Group C: 3-year retention.
Metrics are routed to the appropriate vminsert group by splitting data streams in vmagent, so each time series is sent to exactly one retention group instead of being replicated to all groups. See Deploying vmagent for an example of label‑based routing that implements this split. An optional vmauth layer can be added on top to restrict access to specific sub‑clusters or tenants while still keeping a unified write and read path.
Implementing Multi-Retention on Kubernetes #
In this section, we’ll install and configure the components for a multi-retention deployment of the VictoriaMetrics cluster. See Kubernetes monitoring with VictoriaMetrics Cluster for details on running VictoriaMetrics in Kubernetes.
Run the following command to add the VictoriaMetrics Helm repository:
      helm repo add vm https://victoriametrics.github.io/helm-charts/
helm repo update
Step 1: Deploying storage groups #
We’ll create three storage groups. Each has a different retention period and disk size. Read Understand Your Setup Size to estimate how much space you will need for each group. The following table is shown as an example:
| Group | Retention Period | Total disk size |
|---|---|---|
vmcluster-a | 3 months (3M) | 80 Gi |
vmcluster-b | 1 year (1Y) | 300 Gi |
vmcluster-c | 3 years (3Y) | 900 Gi |
Create a Helm values file for Group A.
      cat <<EOF > vmcluster-a.yaml
vmstorage:
  enabled: true
  replicaCount: 1
  persistence:
    size: 80Gi
  extraArgs:
    retentionPeriod: 3M
  podLabels:
    retention-group: a

vminsert:
  enabled: true
  podLabels:
    retention-group: a

vmselect:
  enabled: false
EOF
The values file above creates vminsert and vmstorage services while turning off vmselect, which we’ll deploy separately. The retentionPeriod flag configures how long data is kept in this group.
Create the values files for Group B and Group C:
      cat <<EOF > vmcluster-b.yaml
vmstorage:
  enabled: true
  replicaCount: 1
  persistence:
    size: 300Gi
  extraArgs:
    retentionPeriod: 1y
  podLabels:
    retention-group: b

vminsert:
  enabled: true
  podLabels:
    retention-group: b

vmselect:
  enabled: false
EOF


cat <<EOF > vmcluster-c.yaml
vmstorage:
  enabled: true
  replicaCount: 1
  persistence:
    size: 900Gi
  extraArgs:
    retentionPeriod: 3y
  podLabels:
    retention-group: c

vminsert:
  enabled: true
  podLabels:
    retention-group: c

vmselect:
  enabled: false
EOF
Deploy the three storage groups with:
      helm upgrade --install vmcluster-a vm/victoria-metrics-cluster -f vmcluster-a.yaml
helm upgrade --install vmcluster-b vm/victoria-metrics-cluster -f vmcluster-b.yaml
helm upgrade --install vmcluster-c vm/victoria-metrics-cluster -f vmcluster-c.yaml

# Wait for all storage pods to be ready
kubectl rollout status statefulset -l app.kubernetes.io/instance=vmcluster-a
kubectl rollout status statefulset -l app.kubernetes.io/instance=vmcluster-b
kubectl rollout status statefulset -l app.kubernetes.io/instance=vmcluster-c
Step 2: Deploying vmselect #
Next, we’ll deploy a vmselect service to route queries to the storage groups.
Create a Helm values file with:
      cat <<EOF >vmselect.yaml
vmstorage:
  enabled: false

vminsert:
  enabled: false

vmselect:
  enabled: true
  replicaCount: 1
  suppressStorageFQDNsRender: true
  extraArgs:
    # Each list item is a single -storageNode flag. In this example, there is
    # one vmstorage pod per retention group, so each entry contains a single host.
    # If you run multiple pods per group, list them as comma-separated hosts
    # in the same -storageNode value.
    #
    # The FQDN format is:
    #   <pod>.<svc>.default.svc
    # where pod = <release>-victoria-metrics-cluster-vmstorage-<N>
    # and   svc = <release>-victoria-metrics-cluster-vmstorage
    storageNode:
      - "vmcluster-a-victoria-metrics-cluster-vmstorage-0.vmcluster-a-victoria-metrics-cluster-vmstorage.default.svc:8401"
      - "vmcluster-b-victoria-metrics-cluster-vmstorage-0.vmcluster-b-victoria-metrics-cluster-vmstorage.default.svc:8401"
      - "vmcluster-c-victoria-metrics-cluster-vmstorage-0.vmcluster-c-victoria-metrics-cluster-vmstorage.default.svc:8401"
EOF
Let’s break down the file above:
- Deploys vmselect as a separate Helm release.
- Disables vminsert and vmstorage as these services were already deployed in Step 1.
suppressStorageFQDNsRender: trueturns off automatic FQDN generation for storage nodes. By default, the Helm chart auto-generates-storageNodesflags, but sincevmstoragehas been disabled, we need to supply them manually inextraArgs.- In
extraArgs.storageNode:we define the vmstorage endpoints for queries. On querying, vmselect merges results across all the specified vmstorages to provide a unified view of the data.
Deploy the vmselect release with:
helm upgrade --install vmselect vm/victoria-metrics-cluster -f vmselect.yaml
Step 3: Deploying vmagent #
We’ll use vmagent to route incoming metrics to the correct retention group. For example, we can use a retention label for mapping metrics to storage groups in the following way:
retention label | Storage Group |
|---|---|
"3mo" | vmcluster-a |
"1yr" | vmcluster-b |
"3yr" | vmcluster-c |
Create the values file for vmagent:
      cat <<EOF >vmagent.yaml
service:
  enabled: true
remoteWrite:
  # Group A: receives metrics with retention="3mo"
  - url: http://vmcluster-a-victoria-metrics-cluster-vminsert:8480/insert/0/prometheus/api/v1/write
    urlRelabelConfig:
      - if: '{retention="3mo"}'
        action: keep
  # Group B: receives metrics with retention="1yr"
  - url: http://vmcluster-b-victoria-metrics-cluster-vminsert:8480/insert/0/prometheus/api/v1/write
    urlRelabelConfig:
      - if: '{retention="1yr"}'
        action: keep
  # Group C: receives metrics with retention="3yr"
  - url: http://vmcluster-c-victoria-metrics-cluster-vminsert:8480/insert/0/prometheus/api/v1/write
    urlRelabelConfig:
      - if: '{retention="3yr"}'
        action: keep
EOF
Metrics without a matching retention label are silently dropped by the keep rules. You must ensure that every metric is labeled, or use a different routing configuration.
Now deploy the vmagent release:
helm upgrade --install vmagent vm/victoria-metrics-agent -f vmagent.yaml
Wait for vmagent to become ready:
kubectl rollout status deploy/vmagent-victoria-metrics-agent
Step 4: Verification #
We can send test data to verify that the data is flowing to the correct storage group.
First, port-forward vmagent and vmselect:
      VMAGENT_SVC=$(kubectl get svc -l app.kubernetes.io/instance=vmagent -o jsonpath='{.items[0].metadata.name}')
kubectl port-forward "svc/$VMAGENT_SVC" 8429 &

VMSELECT_SVC=$(kubectl get svc -l app.kubernetes.io/instance=vmselect -o jsonpath='{.items[0].metadata.name}')
kubectl port-forward "svc/$VMSELECT_SVC" 8481 &
Send test metrics directly to vmagent’s HTTP endpoint to exercise all three retention labels:
      POD=$(kubectl get pod -l app.kubernetes.io/instance=vmagent -o jsonpath='{.items[0].metadata.name}')

for retention in 3mo 1yr 3yr; do
  kubectl exec "$POD" -- wget -qO- --post-data="test_routing{retention=\"${retention}\"} 1.0" \
    "http://127.0.0.1:8429/api/v1/import/prometheus"
done
Query the data back from vmselect (it may take around 30-60 seconds for new data to be available for queries):
      for retention in 3mo 1yr 3yr; do
  echo "-> retention=${retention}"
  curl -s "http://localhost:8481/select/0/prometheus/api/v1/query" \
    --data-urlencode "query=test_routing{retention=\"${retention}\"}"
  echo
done
You can also check that vmagent is forwarding data to all three groups:
curl -s http://localhost:8429/metrics | grep vmagent_remotewrite_blocks_sent_total
Each url="N:secret-url" corresponds to one remoteWrite entry (N=1 for Group A, N=2 for Group B, N=3 for Group C). Non-zero values confirm data is flowing.
Alternative Routing by Existing Labels #
The example setup above relies on a synthetic retention label to exist in every incoming metric.
If having a retention label in every metric isn’t practical, you can, as an alternative, rely on existing labels to map data to the correct storage group.
The following example configures vmagent to route metrics based on the environment and team labels:
      # vmagent.yaml
remoteWrite:
  # send dev and staging data to Group A
  - url: "http://vmcluster-a-victoria-metrics-cluster-vminsert:8480/insert/0/prometheus/api/v1/write"
    urlRelabelConfig:
      - if: {environment=~"dev|staging"}
        action: keep
  # send prod data to Group B
  - url: "http://vmcluster-b-victoria-metrics-cluster-vminsert:8480/insert/0/prometheus/api/v1/write"
    urlRelabelConfig:
      - if: {environment=~"prod|production"}
        action: keep
  # send data from Infra and SRE teams to Group C
  - url: "http://vmcluster-c-victoria-metrics-cluster-vminsert:8480/insert/0/prometheus/api/v1/write"
    urlRelabelConfig:
      - if: {team=~"infra|sre"}
        action: keep
Metrics that do not match any of the keep rules are dropped in the configuration above.
Additional Enhancements #
You can set up vmauth to route data to the specified vminsert group based on the required retention or to restrict which data different users can query.
The following
-auth.config
example exposes the same vmselect backend via vmauth with two users using basic auth:
admin: can query all data across all retention groups.dev: can query only time series that haveteam="dev"label, enforced via theextra_labelquery argument.
      users:
  # User with access to all data across all retention groups
  - username: "admin"
    password: "foo"
    url_map:
      - src_paths:
          - "/api/v1/query"
          - "/api/v1/query_range"
          - "/api/v1/series"
          - "/api/v1/labels"
          - "/api/v1/label/.+/values"
        # vmselect service that aggregates all vmstorage groups
        url_prefix: "http://vmselect-victoria-metrics-cluster-vmselect:8481/select/0/prometheus"

  # User restricted to Dev team data only
  - username: "dev"
    password: "bar"
    url_map:
      - src_paths:
          - "/api/v1/query"
          - "/api/v1/query_range"
          - "/api/v1/series"
          - "/api/v1/labels"
          - "/api/v1/label/.+/values"
        # Same vmselect backend, but enforce label filter at query time
        # by adding extra_label=team=dev to every proxied request
        url_prefix: "http://vmselect-victoria-metrics-cluster-vmselect:8481/select/0/prometheus/?extra_label=team=dev"
This is useful for restricting access by team, environment, or tenant without changing the underlying storage topology.