PreRequisites #
Make sure you have these tools installed
golang,docker,make,git,gcc,ca-certificates,curl,zip:Make sure you have
enterpriseremote configuredgit remote add enterprise <url>Replace
originremote withopensourceto avoid accidentally pushing enterprise stuff to public repository.git remote remove origin git remote add opensource git@github.com:VictoriaMetrics/VictoriaMetrics.gitMake sure you have singing key configured
Make sure you have github token with at least
read:org, repo, write:packagespermissions exported underGITHUB_TOKENenv variable. You can create a token in your profile settingsMake sure you’re authorized for pushing docker images to docker.io and quay.io .
For MacOS users #
Make sure you have GNU version of utilities zip, tar, sha256sum. To install them run the following commands:
      brew install coreutils
brew install gnu-tar
export PATH="/usr/local/opt/coreutils/libexec/gnubin:$PATH"
Docker may need additional configuration changes:
      docker buildx create --use --name=qemu
docker buildx inspect --bootstrap
By default, docker on MacOS has limited amount of resources (CPU, mem) to use. Bumping the limits may significantly improve build speed.
Release #
The release process is divided into two steps.
Step 1 #
In the first step, which usually takes place on Friday, the binaries are compiled, release candidate images are built and pushed, a draft GitHub release is created, and the candidate is deployed to the sandbox environment.
Lock merges for 24h with
/mutex mergein Slack.Make sure you get all changes fetched.
      git fetch opensource
git fetch enterprise
Make sure all the changes are synced between
master,cluster,enterprise-single-nodeandenterprise-clusterbranches. This serves as a double-check. The synchronization should already have been done by the person who merged a PR. You can use the following commands to gather the changes and then compare them using your favorite diff tool.git checkout master && git log v1.xx.y..HEAD --oneline > master_changelog.txt git checkout cluster && git log v1.xx.y-cluster..HEAD --oneline > cluster_changelog.txt git checkout enterprise-single-node && git log v1.xx.y-enterprise..HEAD --oneline > enterprise_changelog.txt git checkout enterprise-cluster && git log v1.xx.y-enterprise-cluster..HEAD --oneline > enterprise_cluster_changelog.txtReview bugfixes in the changelog to determine if they need to be backported to LTS versions. Cherry-pick bug fixes relevant for LTS releases . This serves as a double-check. The initial assessment should already have been done by the person who merged a PR.
Make sure tests pass on branches
master,cluster,enterprise-single-nodeandenterprise-cluster.make test-full make check-allVerify no CVEs in Go code or base images according to the CVE handling policy . It’s sufficient to run
govulncheckon themasterbranch since other branches are checked in CI on regular bases. For image scanning, build and check Alpine base image.make govulncheck make package-base grype --only-fixed [base-image-tag]Re-build
vmuistatic files. Static assets needs to be rebuilt separately for oss and enterprise branches (changes should not be cherry-picked between these branches). See commit example .make vmui-updateMake sure that the release branches have no security issues.
Update release versions if needed in SECURITY.md .
Run
PKG_TAG=v1.xx.y make docs-update-versioncommand to update version help tooltips.Cut new version in CHANGELOG.md and commit it. See example in this commit .
Create the following release tags:
git tag -s v1.xx.yinmasterbranchgit tag -s v1.xx.y-clusterinclusterbranchgit tag -s v1.xx.y-enterpriseinenterprise-single-nodebranchgit tag -s v1.xx.y-enterprise-clusterinenterprise-clusterbranch
Run
TAG=v1.xx.y EXTRA_DOCKER_TAG_SUFFIX=-rcY make publish-release. This command performs the following tasks:- a) Build and package binaries in
*.tar.gzrelease archives with the corresponding_checksums.txtfiles insidebindirectory. This step can be run manually with the commandmake releasefrom the needed git tag. - b) Build and publish multi-platform Docker images
for the given
TAG,TAG-cluster,TAG-enterpriseandTAG-enterprise-cluster. The resulting docker images will have special release candidate suffix for the givenEXTRA_DOCKER_TAG_SUFFIX. The multi-platform Docker image is built for the following platforms:- linux/amd64
- linux/arm64
- linux/arm
- linux/ppc64le
- linux/386
This step can be run manually with the command
make publishfrom the needed git tag.
- c) SPDX
SBOM attestations are
generated automatically by BuildKit during
docker buildx build(--sbom=true). SBOMs can be inspected withdocker buildx imagetools inspect <image> --format "{{ json .SBOM }}"or consumed by vulnerability scanners such as Trivy viatrivy image --sbom-sources oci <image-ref>.
- a) Build and package binaries in
Run
TAG=v1.xx.y make github-create-release github-upload-assets. This command performs the following tasks:- a) Create draft GitHub release with the name
TAG. This step can be run manually with the commandTAG=v1.xx.y make github-create-release. The release id is stored at/tmp/vm-github-releasefile. - b) Upload all the binaries and checksums created at step
11ato that release. This step can be run manually with the commandmake github-upload-assets. It is expected that the needed release id is stored at/tmp/vm-github-releasefile, which must be created at the stepa. If the upload process is interrupted by any reason, then the following recovery steps must be performed:- To delete the created draft release by running the command
make github-delete-release. This command expects that the id of the release to delete is located at/tmp/vm-github-releasefile created at the stepa. - To run the command
TAG=v1.xx.y make github-create-release github-upload-assets, so new release is created and all the needed assets are re-uploaded to it.
- To delete the created draft release by running the command
- a) Create draft GitHub release with the name
Run
TAG=v1.xx.y make github-verify-releaseto verify that draft release with the nameTAGhas been created and this release contains all the needed binaries and checksums.Update the release description with the content of CHANGELOG for this release. Use “Save Draft” button, do not publish the release yet!.
Follow the instructions in LTS release .
Deploy created images to sandbox environment. Make sure it is deployed and don’t introduce any regressions. Follow instructions at Testing Releases .
Step 2 #
In the second step, typically on Monday, the release candidate’s performance in the sandbox is reviewed. If no issues are found, the release candidate is promoted and officially published and announced to the community. Version numbers are updated in the codebase, documentation, and related projects. Issues included in the release are closed, with the comment.
Review the performance of the release candidate in the sandbox environment. If any issues are found, they must be addressed, and the release process restarted from Step 1 with an incremented release candidate version.
Run
TAG=v1.xx.y EXTRA_DOCKER_TAG_SUFFIX=-rc1 make publish-final-images. This command publishes the final release images from release candidate image for givenEXTRA_DOCKER_TAG_SUFFIXand updateslatestDocker image tag for the givenTAG. SBOM attestations are preserved from the RC images byimagetools create. This command must be run only for the latest officially published release. It must be skipped when publishing other releases such as LTS releases or some test releases.Deploy the final images to the sandbox environment and perform a quick smoke test to verify basic functionality works.
Push the tags
v1.xx.yandv1.xx.y-clustercreated at previous steps to public GitHub repository at https://github.com/VictoriaMetrics/VictoriaMetrics :git push opensource v1.xx.y git push opensource v1.xx.y-clusterPush the tags
v1.xx.y,v1.xx.y-cluster,v1.xx.y-enterpriseandv1.xx.y-enterprise-clusterto the corresponding branches in private repository:git push enterprise v1.xx.y git push enterprise v1.xx.y-cluster git push enterprise v1.xx.y-enterprise git push enterprise v1.xx.y-enterprise-clusterImportant note: do not push enterprise tags to public GitHub repository - they must be pushed only to private repository.
Publish release by pressing “Publish release” green button on GitHub releases page .
Update GitHub issues related to the new release. Usually, such issues have a label waiting for release . Close such issues by mentioning which release they were included into, and remove the label. See an example of a closed issue .
Bump VictoriaMetrics version at
deployment/docker/*.yml. For example:for f in $(grep "v1\.116\.0" -R deployment/docker/ -l); do sed -i 's/v1.116.0/v1.117.0/g' $f; doneBump VictoriaMetrics version mentioned in docs .
Run
TAG=v1.xx.y make docs-update-flagscommand to update command-line flags in the documentation. Commit example .Follow the instructions in release follow-up .
Operator #
The operator repository https://github.com/VictoriaMetrics/operator/
- Bump the VictoriaMetrics version in file
internal/config/config.gowith new release version for:VM_METRICS_VERSIONkey indefaultEnvsmap.BaseOperatorConf.MetricsVersiondefault value.
- Run
make docs. - Add the dependency to the new release to the tip section in
docs/CHANGELOG.md(example ). - Commit and send a PR for review.
Helm Charts #
The helm chart repository https://github.com/VictoriaMetrics/helm-charts/
Bump the version of images
Note that helm charts versioning uses its own versioning scheme. The version of the charts not tied to the version of VictoriaMetrics components.
Bump appVersion field in Chart.yaml with new release version.
Add new line to “Next release” section in CHANGELOG.md about version update (the line must always start with “-”). Do NOT change headers in CHANGELOG.md.
Bump version field in Chart.yaml with incremental semver version (based on the CHANGELOG.md analysis).
Do these updates to the following charts:
- Update
vmagentchartversionandappVersioninChart.yaml - Update
vmalertchartversionandappVersioninChart.yaml - Update
vmauthchartversionandappVersioninChart.yaml - Update
clusterchartversionandappVersioninChart.yaml - Update
distributedchartversionandappVersioninChart.yaml - Update
gatewaychartversionandappVersioninChart.yaml - Update
k8s-stackchartversionandappVersioninChart.yaml - Update
singlechartversionandappVersioninChart.yaml
See commit example of a helm chart .
Once updated, run the following commands:
- Commit and push changes to
master. - Run “Release” action on Github:
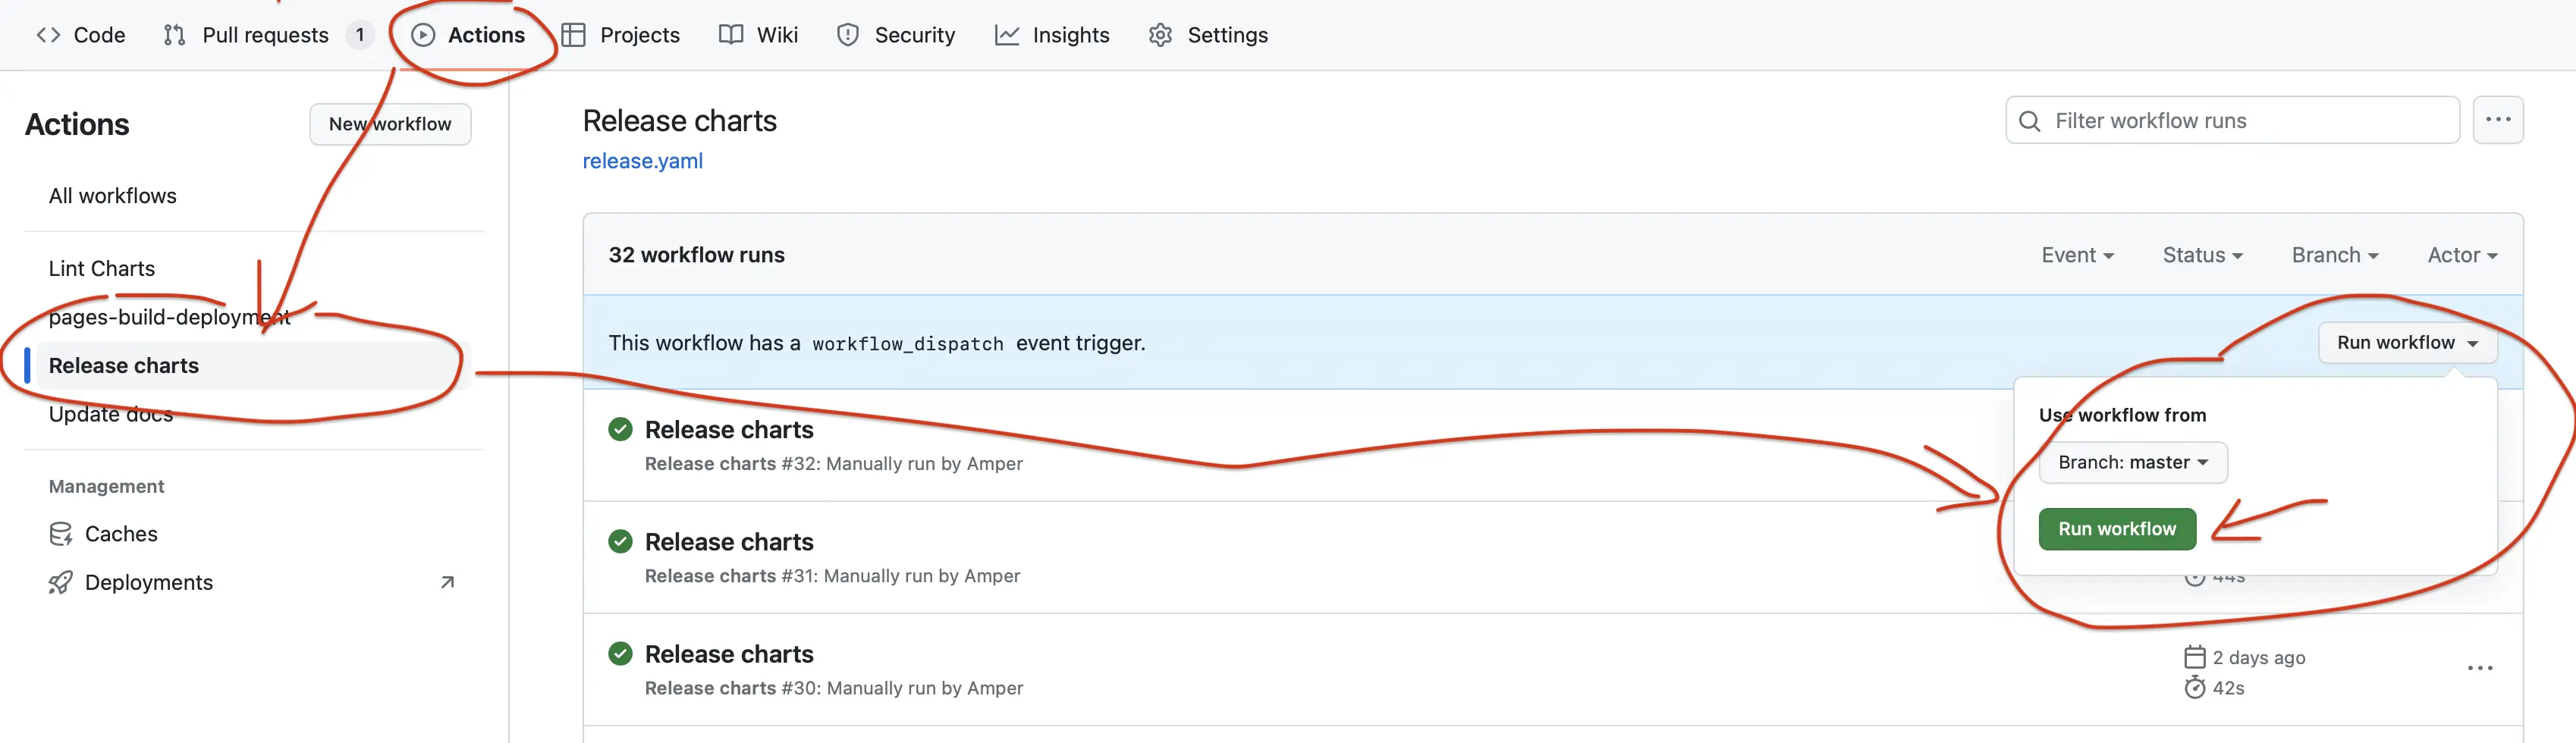
- Merge new PRs “Automatic update CHANGELOGs and READMEs” and “Synchronize docs” after pipelines are complete.
Ansible Roles #
Note that ansible playbooks versioning uses its own versioning scheme. The version of the playbooks is not tied to the version of VictoriaMetrics components.
- Update the version of VictoriaMetrics components at https://github.com/VictoriaMetrics/ansible-playbooks .
- Commit changes.
- Create a new tag with
git tag -sm <TAG> <TAG>. - Push the changes with the new tag. This automatically publishes the new versions to galaxy.ansible.com.